Showing posts with label Halloween. Show all posts

Monday, 26 September 2016

Pueen Halloween Party 01 Stamping Plate - Swatches and Review


Hi girls! Today I will  show "Halloween Party 01"  plate from Pueen!
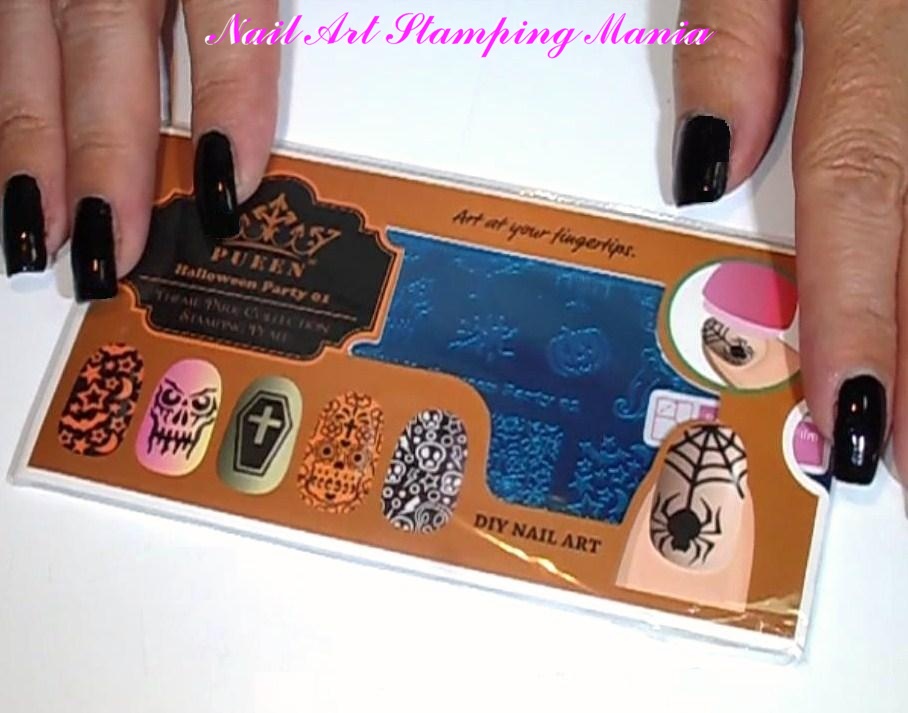
This plate is perfect for the next Halloween season with a lot of themed images: Ghosts, beautiful  pumpkins (I'm crazy for them!), a spider with its spider web, skulls, gloomy trees, a castle bewitched, bats and so on!!!
This plate measure  6.5 x 12.5 cm and the designs measure about 1.8 x 2.4 cm. 
The backside is protected by a lovely rigid plastic, different for each Pueen plate.
The quality of this plate is fantastic....it's is very well engraved! 
You can find Halloween Party 01  HERE and the price is 4.99$ + shipping cost.
Don't miss the video tutorial at the end of the post!


Ciao ragazze! Oggi vi mostrerò la piastra "Halloween Party 01" di  Pueen!
Questa piastra è perfetta per la prossima stagione di Halloween con un sacco di immagini a tema: Fantasmi, bellissime zucche, un ragno con la sua ragnatela, teschi, alberi cupi, un castello stregato, pipistrelli e così via! 
Questa piastra misura 6,5 x 12,5 centimetri e la misura dei disegni è di circa 1,8 x 2,4 centimetri.
La parte posteriore è protetta da una bella plastica rigida, diversa per ogni piastra di Pueen.
La qualità di questa piastra è fantastica....è molto ben incisa!
È possibile trovare Halloween Party 01 QUI e il prezzo è 4,99 $ + spese di spedizione.
Non perdete il video tutorial alla fine del post!


The  packaging
-------
La confezione


The back of this plate is plasticized....so, the edges aren't sharp!!!
------
La parte posteriore di questa piastra è plastificata .... quindi, i bordi non sono 
taglienti!!!


PUEEN Halloween Party 01


I tested the designs with Essence Stampy Black
---------
Ho testato le immagini con Essence Stampy nero


Video Tutorial:


Thanks for watching!!!
Grazie per la visione!!!

Friday, 30 October 2015

Halloween Manicure with Different Plates


Hi girls! I have some more Halloween nails for you guys today! 
I used two coats of Wet n Wild French White Crème as the base colour. Later I made a gradient with Kiko 347, Kiko 346, Kiko 345 and Kiko 369.
For the stamping I used different plates:
- Bundle Monster BM-305 (available here
-Bundle Monster BM-501 (available here )
- Born Pretty BP-16 (available here ....you can use 10% off code: ABYW10
- Qgirl-002 (available here ....you can use 10% off code: ABYW10

I made some stamping decals with Essence Stampy Black and I painted the windows with Kiko 279 and the moon with Wet n Wild French White Crème.
Don't miss the video tutorial!


Ciao ragazze! Ho ancora una manicure di Halloween per voi oggi!
Ho usato due mani di Wet n Wild French White Crème come colore di base. Più tardi ho fatto un gradiente con Kiko 347, 346 Kiko, Kiko 345 e 369 Kiko.
Per lo stamping ho utilizzato diversi piatti:
- Bundle Monster BM-305 (disponibile qui)
Bundle Monster BM-501 (disponibile qui)
- Born Pretty BP-16 (disponibile qui...potete utilizzare il codice ABYW10 per ottenere il  10% di sconto.
- Qgirl-002 (disponibile qui)...potete utilizzare il codice ABYW10 per ottenere il  10% di sconto.

Ho fatto alcuni stamping decals con Essence Stampy nero e ho dipinto le finestre con Kiko 279 e la luna con Wet n Wild French White Crème.
Non perdetevi il video tutorial!


Wet n Wild French White Crème,  Kiko 347, Kiko 346, Kiko 345, Kiko 369, Essence Stampy Black
and Kiko 279


Bundle Monster BM-305


Bundle Monster BM-501


Born Pretty BP-16


Qgirl-002


Instagram Video Tutorial (You can follow me on Instagram    here):
---------
Instagram Video Tutorial (Potete seguirmi su instagram qui):


What I used:

Cosa ho Usato:

  1. Base: Layla Rocky Nail
  2. Base Polish: Wet n Wild French White Crème
  3. Gradient Polishes: Kiko 347, Kiko 346, Kiko 345 and Kiko 369
  4. Stamping Plate:Bundle Monster BM-305, Bundle Monster BM-501, Born Pretty BP-16 and Qgirl-002
  5. Stamping Polish: Essence Stampy Black
  6. Stamping Decal Polish: Kiko 279 and Wet n Wild French White Crème
  7. Top coat:  Essence Quick Dry 

Wednesday, 21 October 2015

Halloween Manicure with UberChic Beauty Plate


Hi everyone, today I have my first Halloween mani of the season! 
I started with two coats of Wet n Wild French White Crème as a base and when it dried I made a circular gradient with Kiko 330, Kiko 288, Kiko 332 and Kiko 333.
After that, I prepared some stamping decals. 
I used  UberChic Beauty Halloween-01 and Essence Stampy Black and I painted  the windows and the eyes with Kiko 279 and the moon with Wet n Wild French White Crème.
UberChic Beauty Halloween-01 plate can be purchased here.
You will find the video tutorial on the bottom of the post.


Ciao a tutti, oggi ho la mia prima manicure di  Halloween della stagione!
Ho iniziato con due mani di Wet n Wild French White Crème  come base e quando si è asciugato ho fatto un gradiente circolare con Kiko 330, 288 Kiko, Kiko 332 e 333 Kiko.
Dopo di ciò ho preparato alcuni stamping decal.
Ho usato UberChic Beauty Halloween-01 e Essence Stampy Black e ho dipinto le finestre e gli occhi con Kiko 279 e la luna con Wet n Wild French White Crème.
UberChic Beauty Halloween-01 può essere comprata qui.
Troverete il  video tutorial sul fondo del post.


Wet n Wild French White Crème,  Kiko 330, Kiko 288, Kiko 332,  Kiko 333, Essence Stampy Black
and Kiko 279


UberChic Beauty Halloween-01


Instagram Video Tutorial (You can follow me on Instagram    here):
---------
Instagram Video Tutorial (Potete seguirmi su instagram qui):


What I used:

Cosa ho Usato:

  1. Base: Layla Rocky Nail
  2. Base Polish: Wet n Wild French White Crème
  3. Gradient Polishes: Kiko 330, Kiko 288, Kiko 332 and Kiko 333
  4. Stamping Plate:UberChic Beauty Halloween-01
  5. Stamping Polish: Essence Stampy Black
  6. Stamping Decal Polish: Kiko 279.
  7. Top coat:  Essence Quick Dry