Showing posts with label LEADLIGHT TECHNIQUE. Show all posts

Tuesday, 2 May 2017

LeadLight Stamping Technique with Watercolor Pencils - Tutorial


Hi girls! In this post I will show you the "Leadlight Stamping" technique with watercolor pencils!
I started with two layers of white polish (Wet n Wild French White Crème). 
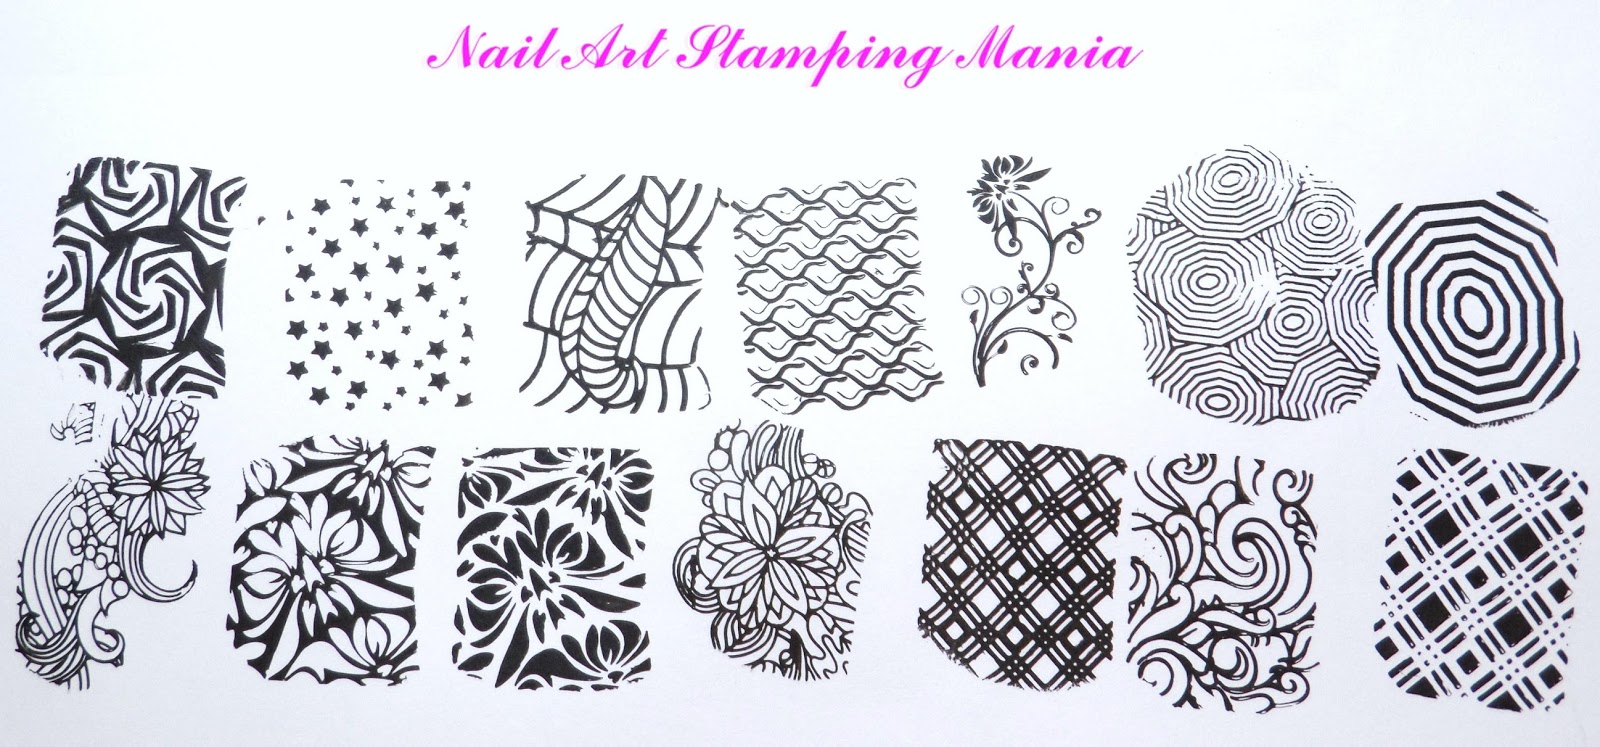
I stamped some images from the stamping plate TU-018 from AliExpress and MdU 2 Black.
Later, I applied one layer of UV Led Matt Top Coat from Vrenmol and I let it dry with Led lamp. 
I've increased the matte effect using a fine-grained file and I painted with a few of watercolor pencils (Stabilo Acquacolor).
I chose to use the watercolor pencils because are softer compared with normal pencils.
Finally, I protected with top coat glossy....and later I choose to try also the top coat matt. 
I love both versions!!!
You can buy this plate HERE, the matte top coat soak off HERE and MdU stamping polish HERE.
At the end of the post you will find the video tutorial!


Ciao ragazze! In questo post vi mostrerò la tecnica del "Leadlight Stamping" con matite acquerello!
Ho iniziato con due mani di smalto bianco (Wet n Wild French White Crème). 
Ho timbrato alcune immagini dalla piastra TU-018 di AliExpress e MdU 2 Black.
Più tardi, ho applicato una mano di UV Led Matt Top Coat di Vrenmol e ho lasciato asciugare con la lampada Led.
Ho aumentato l'effetto opaco utilizzando una lima a grana fine e ho dipinto con alcune delle matite acquerellabili (Stabilo Acquacolor).
Ho scelto di utilizzare le matite acquerellabili perché sono più morbide rispetto alle matite normali.
Infine, ho protetto con top coat lucido....e poi ho scelto di provare anche il top coat opaco.
Amo entrambe le versioni!!!
Potete comprare questa pistra QUI, il top coat soak off opaco QUI e lo malto per stampare MdU QUI.
Alla fine del post troverete il video tutorial! 


TU-018 from AliExpress


Matt effect!


Video Tutorial:


What I used:

Cosa ho Usato:

  1. Base: Layla Rocky Nail
  2. Base Polish: Wet n Wild French White Crème 
  3. Top Coat: Vrenmol Matt Top Coat UV&Led Soak Off
  4. Stamping Plate: TU-018 from AliExpress
  5. Stamping Polish: MdU 2 Black
  6. Nail Art Supplies: Fine-grained file.
  7. LeadLigh Colors: Watercolor pencils "Stabilo Aquacolor".
  8. Top coat:  Essence Quick Dry


Thanks for reading!!! ♥
Grazie per la lettura!!! ♥

Saturday, 17 December 2016

UberChic Beauty Numbers-01 Plate and New Year's Day Manicure - Review and Tutorial


Hello girls! Today I wish to talk about a stamping plate by UberChic Beauty dedicated to numbers!
This plate was released many time ago but I think it's perfect for celebrate the New Year.  Obviously, you can use it each time you need celebrate an important date!!!
In this plate you can find different kinds of numeric font, as well as , other fonts and some words perfect for a special date!
The size of the plate is 9.5 cm by 14.5 cm and all images are well engraved!
UberChic Beauty Numbers-01  is available HERE and the price is $14.99 + shipping cost.
Now, I let you with the images and with the video tutorial!!!


Ciao ragazze! Oggi desidero parlarvi di una piastra di UberChic Beauty dedicata a numeri!
Questa piastra è uscita molto tempo fa, ma penso che sia perfetta per festeggiare il nuovo anno. Ovviamente, è possibile utilizzarla ogni volta che è necessario celebrare una data importante!!!
In questa piastra si possono trovare diversi tipi di caratteri numerici, così come altri tipi di caratteri e alcune parole perfette per una data speciale!
La dimensione della piastra è di 9,5 cm per 14,5 cm e tutte le immagini sono ben incise!
UberChic Beauty Numbers-01 è disponibile QUI e il prezzo è $ 14,99 + spese di spedizione.
Ora, vi lascio con le immagini e con il video tutorial !!!


This plate measures 14.6 cm x 9.5 cm
-------
Questa piastra misura 14.6 cm x 9.5 cm


UberChic Beauty Numbers-01


I tested the images with Essence Stampy Black
---------
Ho testato le immagini con Essence Stampy nero


For this manicure I used three layer of holo glitter polish. 
I stamped with some patterns of this plate and Konad black. 
Later, I painted with some permanent markers.
------
Per questa manicure ho usato tre mani di smalto con glitter holo . 
Ho timbrato con alcuni modelli di questa piastra e Konad nero. 
Poi, ho dipinto con alcuni pennarelli indelebili.


Video Tutorial:


What I used:

Cosa ho Usato:

  1. Base: Layla Rocky Nail
  2. Base Polish: L'Oreal Jet-Set 003
  3. Stamping Plate:  UberChic Beauty Numbers-01
  4. Stamping Polish: Konad Black
  5. Layered Polishes: Permanent Markers
  6. Top coat:  Essence Quick Dry


Thanks for reading!!! ♥
Grazie per la lettura!!! ♥


Saturday, 3 December 2016

Roses and Canary Manicure with LeadLight technique - Tutorial


Hey there! In this post I will show you a floral manicure made with LeadLight Technique and an AliExpress plate. 
As a base I used two coats of white polish and I stamped with OS-02 plate and Essence Stampy Black. Later, I painted with Sharpie permanent markers of many colors.
This plate is available HERE
For more details don't miss the video tutorial!!!


Ehilà! In questo post vi mostrerò una manicure floreale realizzata con la tecnica LeadLight e una piastra di AliExpress.
Come base ho usato due mani di smalto bianco e ho timbrato con la piastra OS-02 ed Essence Stampy nero.
Poi, ho dipinto con pennarelli permanenti Sharpie di molti colori.
Questa piastra è disponibile  QUI
Per maggiori dettagli non perdete  il video tutorial !!!


OS-02


The patterns that I choose
--------
I modelli che ho scelto


Video Tutorial:


What I used:

Cosa ho Usato:

  1. Base: Layla Rocky Nail
  2. Base Polishes: Wet n Wild French White Crème 
  3. Stamping Plate:  AliExpress OS-02 plate.
  4. Stamping Polish: Essence Stampy Black
  5. LeadLight: Permanent Markers
  6. Top coat:  Essence Quick Dry


Thanks for reading!!! ♥
Grazie per la lettura!!! ♥

Tuesday, 13 September 2016

Crystals Manicure with Alcohol Inks and Cici&Sisi Geometry 02 Plate


Hi girls! Today I'll show you a Crystals Manicure done with Cici&Sisi acrylic plate and Alcohol Inks!
I applied two layers of white polish and I let it dry.
I stamped with Cici&Sisi Geometry 02 and Konad Black.
I applied the top coat and I let it dry. Late, I painted the crystals with Alcohol Inks mixed with Isopropyl Alcohol to obtain many kind of crystals: Citrine quartz, topaz, rose quartz, amethysts, aquamarines, sapphires, peridots, emeralds,  fire opals and rubies (on thumb).
You can find this plate HERE.
Now I let you with the images and the video at the end of the post!


Ciao ragazze! Oggi vi mostrerò una manicure con Cristalli fatta con piastra acrilica di Cici&Sisi e inchiostri ad alcool!
Ho applicato due mani di smalto bianco e ho  lasciato asciugare.
Ho timbrato con Cici&Sisi Geometry 02 e Konad nero.
Ho applicato il top coat e ho lasciato asciugare. Poi, ho dipinto i cristalli con inchiostri ad alcool mescolati con alcool isopropilico per ottenere molti tipi di cristalli:  Citrini, topazi, quarzi rosa, ametiste, acquemarine, zaffiri, peridoti, smeraldi, opali di fuoco e rubini (sul pollice).
Potete trovare questa piastra QUI .
Ora vi lascio con le immagini e il video alla fine del post!


Cici&Sisi Geometry 02


The pattern that I chosen


Video Tutorial:


What I used:

Cosa ho Usato:

  1. Base: Layla Rocky Nail
  2. Base Polishes: Wet n Wild White Crème 
  3. Stamping Plate:  Cici&Sisi Geometry 02
  4. Stamping Polish: Konad Black
  5. LeadLight Polishes: Yellow, Orange, Magenta, Purple, Blue, Sapphire, Lime Green and  Rainforest Green (Alcohol Inks +  Isopropyl Alcohol)
  6. Top coat:  Essence Quick Dry


Thanks for reading!!! ♥

Grazie per la lettura!!! ♥

Tuesday, 12 July 2016

UberChic Beauty Collection 10 - Swatches And Review


Hi stampaholics!
I'm here again with another stamping plates review!
It's the tenth Collection from UberChic Beauty! I'm in love with this brand of plates and each collection that they launch doesn't disappoint my expectations!
In the three plates contained in this set you can find a lot of flowers (roses, hibiscus, carnations), scripts,  mandala, geometrical designs as well as a lot of negative-space images perfect to let your nail polish to shine through!
These plates measure 9.5 cm x 14.5 cm each and most of full nail images measure 17 x 21 mm. The quality is excellent as always and the back of each plate is plasticized.
You can can find UberChic Beauty Collection 10 HERE. The price is $24.99 for each set + shipping cost.
Now, I let you with all images and with my video tutorial !!!


Ciao amanti dello stamping!
Sono sono ancora qui con un'altra recensione di piastre per stamping!
Si tratta della decima collezione di UberChic Beauty! Mi sono innamorata di questa marca di piastre e ogni collezione che lanciano non delude le mie aspettative!
Nei tre piatti contenuti in questo set è possibile trovare un sacco di fiori (rose, garofani, ibisco), scritte, mandala, disegni geometrici ed anche un sacco di immagini "negative space" perfette per lasciar trasparire il vostro smalto!
Queste misurano 9,5 cm x 14,5 cm ciascuna e la maggior parte delle immagini a chiodo misura 17 x 21 mm. La qualità è eccellente come sempre e la parte posteriore di ciascuna piastra è plastificata.
È possibile trovare UberChic Beauty Collection 10 QUI. Il prezzo è di 24,99 $ per ogni set ( 23.4€)  + spese di spedizione.

Ora, vi lascio con le immagini e con il mio video tutorial!!!


The back of these plates is protected, so, the edges  aren't sharp!!! 
---------
La parte posteriore di queste piastre è protetta, quindi, i margini non sono taglienti !!!


Remember to remove the blue film
--------
Non dimenticate di rimuovere la pellicola blu!!!!


Each plate measures 14.6 cm x 9.5 cm
-------
Ogni piastra misura 14.6 cm x 9.5 cm


Almost all the images measure 2.1 cm x 1.7 cm
---------
Quasi tutte le immagini misurano 2.1 cm x 17 cm


UberChic Beauty 10-01


UberChic Beauty 10-02


UberChic Beauty 10-03


I tested some designs with Essence Stampy Black
-----
Ho testato alcune immagini con Essence Stampy nero


I used one of these plates for this LeadLight manicure...
 I used Color Club "Harp On It" as a base.
I stamped with UberChic Beauty 10-01 and Essence Stampy Black.
Later I painted with some Ink colors mixed with Isopropyl Alcohol
------
 Per questa LeadLight manicure ho usato una di queste piastre...
Ho usato Color Club "Harp On It" come base.
Ho stampato con UberChic Beauty 10-01 ed Essence Stampy Black..
Poi ho dipinto con Inchiostri ad alcool mescolati con alcool isopropilico.


Video tutorial


What I used:

Cosa ho Usato:

  1. Base: Layla Rocky Nail
  2. Base Polish: Color Club "Harp On It"
  3. Stamping Plate:  UberChic Beauty 10-01
  4. Stamping Polish: Essence Stampy Black
  5. LeadLight Polishes: Yellow Ink Color + thinner for ink colors,  Blue Alcohol Ink + Isopropyl Alcohol, Magenta Alcohol Ink + Isopropyl Alcohol.
  6. Top coat:  Essence Quick Dry


Thanks for watching!