Showing posts with label Konad. Show all posts

Wednesday, 15 March 2017

Small Cone Stamper Head Set and Cici&Sisi - Flower 04 Plate from Cici&Sisi - Swatches and Review


Hi girls! Today I will review the Cone Stamper Head Set from Cici&Sisi!!!

The Clear Stamper Set from now is available in  three options:
-  2 round heads (3.0 cm) + 1 handle + 1 scraper
-  1 round head (3.0 cm) + 1 cone head (1.5 cm) + 1 handle + 1 scraper
-  1 round head (3.0 cm) + 1 diamond head (3.0 cm) + 1 handle + 1 scraper
I will show you the option with the cone head. 
I'm very proud to tell you that I was contacted by Cici&Sisi to suggest new ideas about stamping and I suggested this kind of stamper because due the small head (1.5 cm) is perfect to pick up little designs. In particular is perfect for layered images!
The Cone Stamper Set is sold HERE and the price is $12.99 + shipping cost.
I let you with the images and the video tutorial at the end of the post!


Ciao ragazze! Oggi recensirò il Cone Stamper Head Set di Cici&Sisi!!! 

Il Clear Stamper Set da ora è disponibile in tre opzioni:
- 2 teste rotonde (3,0 cm) + 1 manico + 1 raschietto
- 1 testa rotonda (3,0 cm) + 1 testa a cono (1,5 cm) + 1 manico + 1 raschietto
- 1 testa rotonda (3,0 cm) + 1 testa di diamante (3,0 cm) + 1 manico + 1 raschietto
Vi mostrerò l'opzione con la testa a cono. 
Sono molto orgogliosa di dirvi che sono stata contattata da Cici&Sisi per suggerire nuove idee sullo stamping e ho proposto questo tipo di stamper perché a causa della  testa piccola (1.5 cm) è perfetto per raccogliere piccoli disegni. In particolare è perfetto per immagini a più livelli (Layered)!
Il Cone Stamper Set è venduto QUI e il prezzo è di $12,99 + spese di spedizione. 
Vi lascio con le immagini e il video tutorial alla fine del post!


1 round head (3.0 cm) + 1 cone head (1.5 cm) + 1 handle + 1 scraper
------
 1 testa rotonda (3,0 cm) + 1 testa a cono (1,5 cm) + 1 manico + 1 raschietto


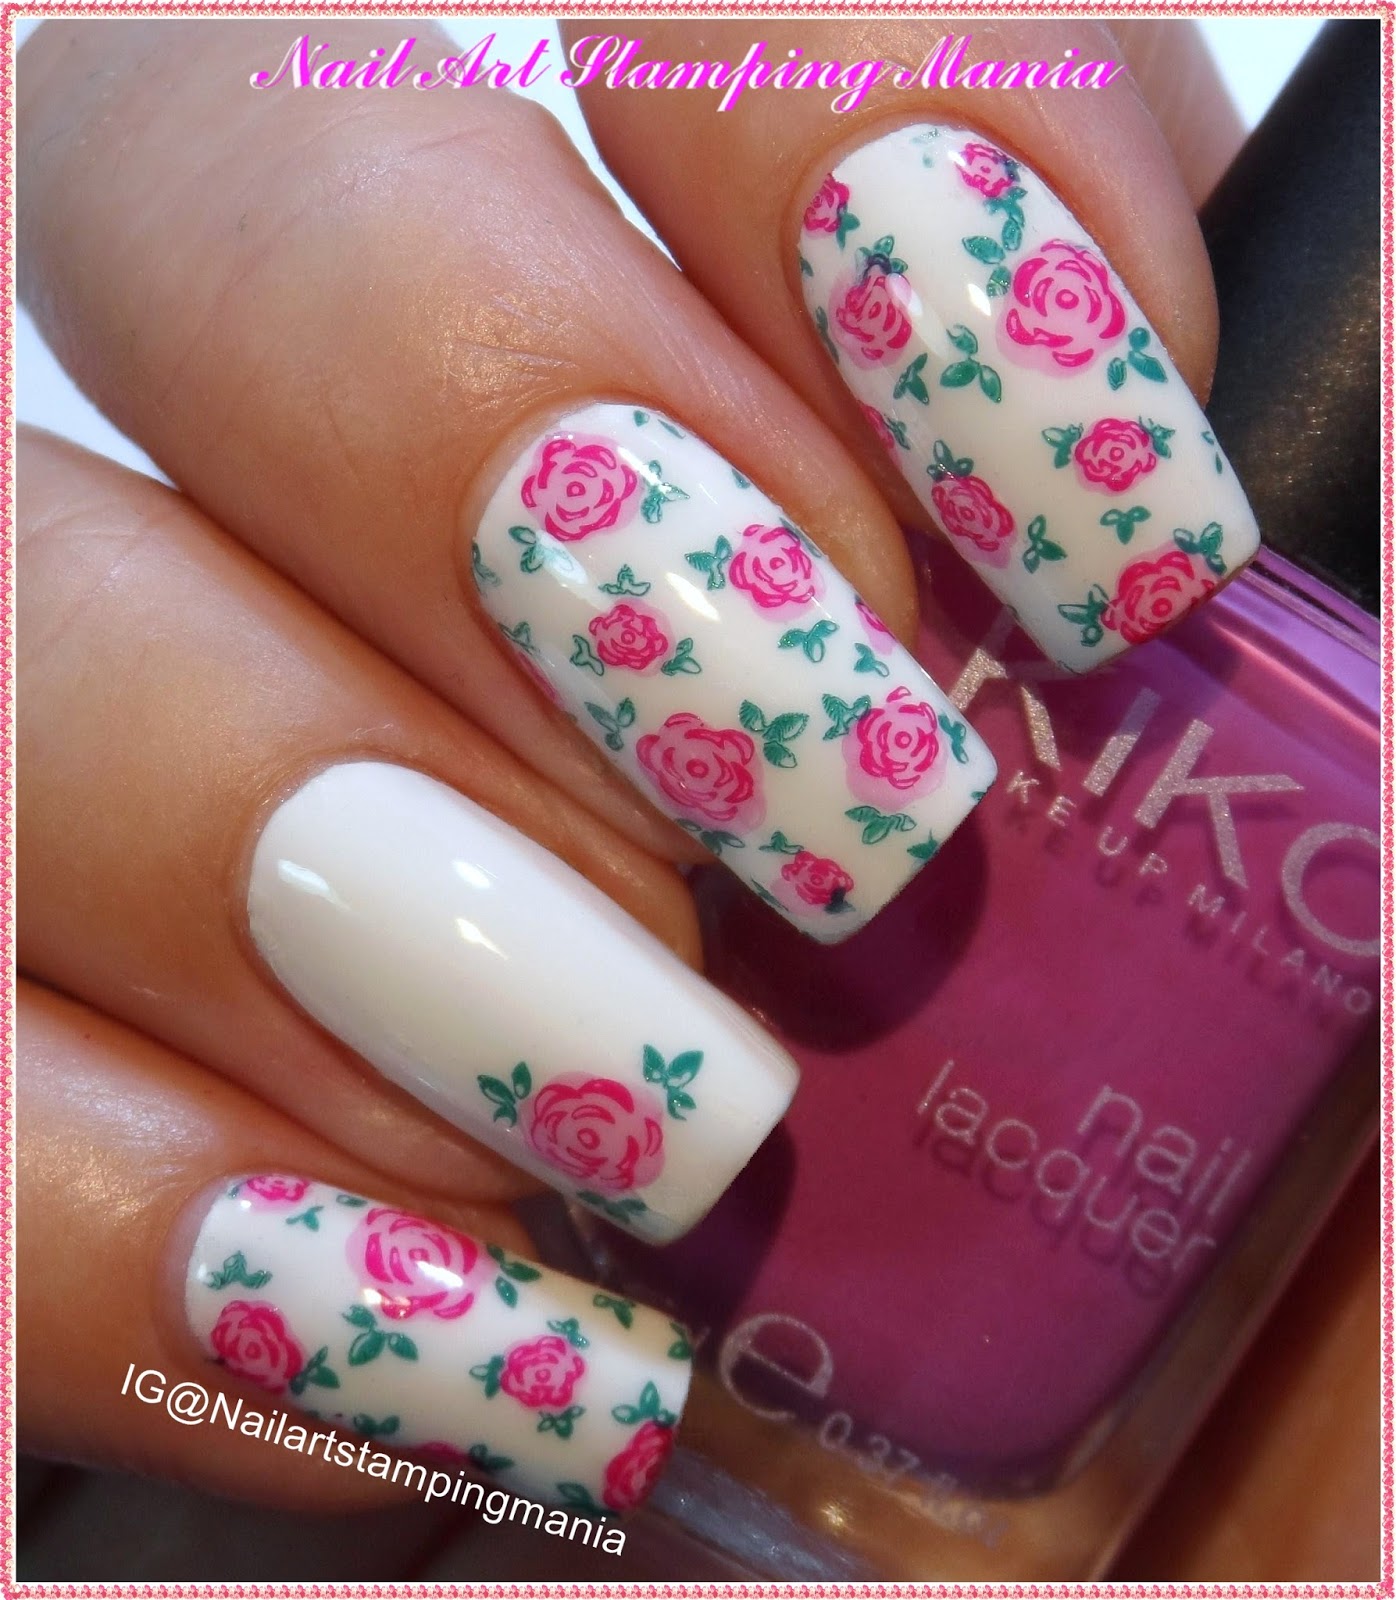
I tested this product with the acrylic plate Cici&Sisi - Flower 04 and I made a manicure with layered stamping. 
I used a metal polish as a base (Kiko Mirror 624). 
Later, I stamped the birds with Colour Alike Sunshine and Juicy Tangerine and I superimposed the contour of the bird using Konad black. For the flowers I used Colour Alike Sweetheart and Sunset and for the contours I used again Konad black. Finally, I applied Essence Fast Dry to protect.
Cici&Sisi - Flower 04 is sold HERE.


Ho testato questo prodotto con la piastra in acrilico Cici&Sisi - Flower 04 e ho fatto una manicure con il Layered stamping (a più livelli).
Ho usato uno smalto metallico come base (Kiko Mirror 624).
Poi, ho timbrato gli uccellini con Colour Alike Sunshine e Juicy Tangerine e ho sovrapposto il contorno degli uccelli utilizzando Konad nero. Per i fiori ho usato Colour Alike Sweetheart e Sunset e per i contorni  ho usato di nuovo Konad nero. Infine, ho applicato Essence Fast Dry per proteggere.
Cici&Sisi - Flower 04 è in vendita QUI .


Cici&Sisi - Flower 04 plate


Video Tutorial:


What I used:

Cosa ho Usato:

  1. Base: Layla Rocky Nail
  2. Base Polish: Kiko Mirror 624
  3. Stamping Plate: Cici&Sisi - Flower 04
  4. Stamping Polishes: Colour Alike Sunshine, Juicy Tangerine, Sweetheart, Sunset and Konad Black
  5. Top coat:  Essence Quick Dry


Thanks for reading!!! ♥
Grazie per la lettura!!! ♥

Saturday, 17 December 2016

UberChic Beauty Numbers-01 Plate and New Year's Day Manicure - Review and Tutorial


Hello girls! Today I wish to talk about a stamping plate by UberChic Beauty dedicated to numbers!
This plate was released many time ago but I think it's perfect for celebrate the New Year.  Obviously, you can use it each time you need celebrate an important date!!!
In this plate you can find different kinds of numeric font, as well as , other fonts and some words perfect for a special date!
The size of the plate is 9.5 cm by 14.5 cm and all images are well engraved!
UberChic Beauty Numbers-01  is available HERE and the price is $14.99 + shipping cost.
Now, I let you with the images and with the video tutorial!!!


Ciao ragazze! Oggi desidero parlarvi di una piastra di UberChic Beauty dedicata a numeri!
Questa piastra è uscita molto tempo fa, ma penso che sia perfetta per festeggiare il nuovo anno. Ovviamente, è possibile utilizzarla ogni volta che è necessario celebrare una data importante!!!
In questa piastra si possono trovare diversi tipi di caratteri numerici, così come altri tipi di caratteri e alcune parole perfette per una data speciale!
La dimensione della piastra è di 9,5 cm per 14,5 cm e tutte le immagini sono ben incise!
UberChic Beauty Numbers-01 è disponibile QUI e il prezzo è $ 14,99 + spese di spedizione.
Ora, vi lascio con le immagini e con il video tutorial !!!


This plate measures 14.6 cm x 9.5 cm
-------
Questa piastra misura 14.6 cm x 9.5 cm


UberChic Beauty Numbers-01


I tested the images with Essence Stampy Black
---------
Ho testato le immagini con Essence Stampy nero


For this manicure I used three layer of holo glitter polish. 
I stamped with some patterns of this plate and Konad black. 
Later, I painted with some permanent markers.
------
Per questa manicure ho usato tre mani di smalto con glitter holo . 
Ho timbrato con alcuni modelli di questa piastra e Konad nero. 
Poi, ho dipinto con alcuni pennarelli indelebili.


Video Tutorial:


What I used:

Cosa ho Usato:

  1. Base: Layla Rocky Nail
  2. Base Polish: L'Oreal Jet-Set 003
  3. Stamping Plate:  UberChic Beauty Numbers-01
  4. Stamping Polish: Konad Black
  5. Layered Polishes: Permanent Markers
  6. Top coat:  Essence Quick Dry


Thanks for reading!!! ♥
Grazie per la lettura!!! ♥


Saturday, 10 December 2016

Holly Manicure with UberChic Beauty Christmas-02 Nail Stamping Plate and Gold Powder - Tutorial


Hello Everyone! In this post I will show you a holly manicure for Christmas with UberChic Beauty Christmas-02 stamping plate and gold pigment!
As a base I applied an holographic gold polish to give more light to the gold powder.
Later, I applied one layer of Top Coat Soak Off No Wipe and I applied the powder with an eye shadow applicator.
I added another layer of Top Coat Soak Off to protect the pigment and I stamped with UberChic Beauty 
Christmas-02 plate, Konad Red and MdU 8 Green. 
On the ring finger I added three red rhinestones. Top coat  to finish!
This plate is sold HERE but for now it's out of stock. It will be available again on 12/19. You can find the gold pigment on AliExpress.
It's all for today! Don't miss the video tutorial at the end of the post!!! 


Ciao a tutti! In questo post vi mostrerò una manicure con agrifogli per Natale fatta con la piastra Christmas-02 di UberChic Beauty e del pigmento dorato!
Come base ho applicato uno smalto oro olografico per dare più luce alla polvere d'oro.
Poi, ho applicato una mano di Top Coat Soak Off senza residui e ho applicato la polvere con un applicatore per ombretto.
Ho aggiunto un'altra mano di Top Coat Soak Off per proteggere il pigmento e ho timbrato con la piastra UberChic Beauty Christmas-02,  Konad rosso e MdU 8 Green.
Sul anulare ho aggiunto tre strass rossi. Top coat alla fine!
Questa piastra è venduta QUI, ma per ora è esaurita. Sarà nuovamente disponibile il 12/19. 
È possibile trovare il pigmento oro su AliExpress.
E 'tutto per oggi! Non perdete il video tutorial alla fine del post!!!


UberChic Beauty Christmas-02


Video Tutorial:


What I used:

Cosa ho Usato:

  1. Base: Layla Rocky Nail
  2. Base Polish: Jade Mystic Gold
  3. Top Coat Soak Off:  Elite 99 No Wipe
  4. Nail Art Pigments: Gold pigment from AliExpress
  5. Stamping Plate:  UberChic Beauty Christmas-02
  6. Stamping Polish: Konad Red and MdU 8 Green
  7. Nail Art Decorations: Some red rhinestones.
  8. Top coat:  Essence Quick Dry


Thanks for reading!!! ♥
Grazie per la lettura!!! ♥


Wednesday, 2 November 2016

UberChic Beauty Collection 12 and Roses Manicure - Swatches and Review


Hey there! Would you believe that UberChic Beauty has already arrived at the twelfth Collection of stamping plates?
Well, today I will show you this beautiful set in which you can find flowers, geometrical images, paisleys, mandala and a lot of negative designs!!!
But, apart from the wide range of images, there are also some Layered images...Keep an eye on the tiny arrow on the plates to go to find them!!!!!! I love the Layered images, you can superimpose them or use them also singly!
The Collection contains three plates that measure 9.5 cm x 14.5 cm each.
There are full nail images (that measure 17 x 21 mm) as well as individual images (down the center of the plates) that complemented the full nail designs.
Each plate comes with a PVC Sticker on the back to ensure you won’t get cut.
You can can find UberChic Beauty Collection 12 HERE. The price is $24.99 + shipping cost but for now it costs 22.99$ because there is a small typo on the plate 12-03: "this to shall pass" should read "this too shall pass" that will be correcting it in the next re-launch.
Now, I let you with all images and with my video tutorial!!!


Ehilà! Ci credereste che UberChic Beauty è già arrivata alla dodicesima Collezione di piastre?
Bene, oggi vi mostrerò questo bel set in cui si possono trovare fiori, immagini geometriche, paisleys, mandala e un sacco di disegni negative space!!!
Ma, a parte la vasta gamma di immagini, ci sono anche alcune immagini a più livelli (Layered)... Tenete d'occhio la piccola freccia sulle piastre per andare a trovarle!!! Amo le immagini a più livelli, è possibile sovrapporle o usarle anche singolarmente!
La raccolta contiene tre piastre che misurano 9,5 cm x 14,5 cm ciascuna.
Ci sono immagini a unghia piana (che misurano 17 x 21 mm), così come singole immagini (lungo il centro delle piastre), che completato i disegni a unghia piena.
Ogni piastra è dotata di un adesivo in PVC sul retro per assicurare che non ci si possa tagliare.
È possibile trovare UberChic Beauty Collection 12 QUI. Il prezzo è di $ 24,99 + spese di spedizione per ogni set, ma per ora costa  22.99$ perché c'è un piccolo errore di battitura sulla piastra 12-0 ("this to shall pass" doveva leggersi "this too shall pass") che verrà corretta nella prossima riedizione.
Ora, io vi lascio con le immagini e con il mio video tutorial !!!


The back of these plates is protected with paper and the blue film must be removed before use!!!
---------
La parte posteriore di queste piastre è protetta con carta e la pellicola blu deve essere rimossa 
prima dell'uso !!!


Each plate measures 14.6 cm x 9.5 cm
-------

Ogni piastra misura 14.6 cm x 9.5 cm


Almost all the images measure 2.1 cm x 1.7 cm
---------
Quasi tutte le immagini misurano 2.1 cm x 17 cm


UberChic Beauty 12-01


UberChic Beauty 12-02


UberChic Beauty 12-03


I tested some designs with Essence Stampy Black
-----
Ho testato alcune immagini con Essence Stampy nero


 For this Layered manicure I used UberChic Beauty 12-03...
 I used Wet n Wild French White Crème as a base.
I stamped with Kiko 314, Kiko 285 and Konad Dark Green.
------
 Per questa Layered manicure ho usato UberChic Beauty 12-03...
Ho usato Wet n Wild French White Crème come base.
Ho stampato con Kiko 314, Kiko285 e Konad Verde Scuro.


Video tutorial:


What I used:

Cosa ho Usato:

  1. Base: Layla Rocky Nail
  2. Base Polish: Wet n Wild French White Crème
  3. Stamping Plate:  UberChic Beauty 12-03
  4. Stamping Polish: Kiko 314, Kiko 285 and Konad Dark Green.
  5. Top coat:  Essence Quick Dry

Thanks for reading!!! ♥
Grazie per la lettura!!! 


Monday, 29 August 2016

Pine Cones Manicure with UberChic Beauty Uber Mini plate - Tutorial


Hi to everyone!!! Today I made a Pine Cones Manicure with UberChic Beauty Uber Mini Great Outdoors plate!
I started off with 2 coats of White for my base (Wet' n Wild Black Crème). 
I made a gradient with Mi-ny Top Five Green as you can see how in the video tutorial below.
Than, I prepared some stamping decals with  the pine cones pattern of this plate and I stamped them in Brown (Konad Brown). Later I colored them with Kiko 369. I stamped the pine needles separately with MdU 37 High Green. For the pinkie and the little pine cone on middle finger I used the shrinking technique to obtain smaller pine cones.
Finally, on my index finger I applied two coats of Layla Hologram Effect Coffee Love and I stamped the acorns with Kiko 369.
This plate is available  HERE and the price is 7.99. The MdU stamping polishes are sold HERE.
Don't miss the video tutorial below!


Ciao a tutti!!! Oggi ho fatto una manicure con pigne con la piastra di  UberChic Beauty Uber Mini Great Outdoors!
Ho iniziato con 2 mani di bianco per la mia base (Wet' n Wild White Crème).
Ho fatto uno sfumato con Mi-ny Top Five verde come si può vedere come nel video tutorial più sotto.
Poi, ho preparato alcuni stamping decals con le pigne di questa piastra e li ho timbrati in marrone ( Konad Marrone). Più tardi li ho colorati con Kiko 369. Ho timbrato gli aghi di pino con MDU 37 High Green. Per il mignolo e la piccola pigna sul dito medio ho usato la tecnica di rimpicciolimento per ottenere pigne più piccole.
Infine, sull'indice ho applicato due mani di Layla Hologram Effect Coffee Love e ho timbrato le ghiande con Kiko 369.
Questa piastra è disponibile QUI e il prezzo è di 7,99. Gli smalti per stamping di MdU sono in vendita QUI.
Non perdete il video tutorial qui sotto!


UberChic Beauty Uber Mini Great Outdoors


The patterns that I choose
--------
I modelli che ho scelto


Wet n Wild White Crème,  Mi-ny Top Five Green, Konad Brown, MdU 37 High Green, Kiko 369 and Layla Hologram Effect Coffee Love


Video Tutorial:


What I used:

Cosa ho Usato:

  1. Base: Layla Rocky Nail
  2. Base Polishes: Wet n Wild White Crème and Layla Hologram Effect Coffee Love (index finger)
  3. Gradient Polish: Mi-ny Top Five Green
  4. Stamping Plate:  UberChic Beauty Uber Mini Great Outdoors
  5. Stamping Polishes: MdU 37 High Green, Konad Brown and Kiko 369 (index finger)
  6. Stamping Decal Polish: Kiko 369
  7. Top coat:  Essence Quick Dry


Thanks for reading!!! ♥


Grazie per la lettura!!! ♥