Showing posts with label Sinful Colors. Show all posts

Friday, 16 December 2016

Christmas Bell Manicure with Cici&Sisi Happy New Year 03 plate - Tutorial


Hi girls! Today's manicure is made with a Christmas plate from Cici&Sisi!
I started with two layer of Sinful Colors Snow Me White as a base.
Later, I prepared some stamping decals with Happy New Year 03 and MdU 2 Black. I painted them with L'Oreal Jet-Set 003, Kiko 343 and Kiko 236. On my ring finger I added a top coat with holo glitters ( L'Oreal Jet-Set 003) and I applied a stamping decal made with another pattern of the same plate.
Finally, I applied a rhinestone over the ribbon.
You can find this plate HERE.
Don't miss the video at the bottom of the post to see all details!


Ciao ragazze! La manicure di oggi è fatta con una piastra di Natale di Cici&Sisi!
Ho iniziato con due mani di Sinful Colors Snow Me White come base.
Più tardi, ho preparato alcuni stamping decals con Happy New Year 03 e MdU 2 Black. Li ho dipinti con L'Oreal Jet-Set 003, Kiko 343 e Kiko 236. Sull'anulare ho aggiunto un top coat con brillantini olografici (L'Oreal Jet-Set 003) e ho applicato uno stamping decal  fatto con un altro modello della stessa piastra.
Infine, ho applicato un strass sopra il nastro.
È possibile trovare questa piastra QUI.
Non perdetevi il video in fondo al post per vedere tutti i dettagli!


Cici&Sisi Happy New Year 03


Video Tutorial:


What I used:

Cosa ho Usato:

  1. Base: Layla Rocky Nail
  2. Base Polish: Sinful Colors Snow Me White
  3. Stamping Plate:  Cici&Sisi Happy New Year 03
  4. Stamping Polish: MdU 2 Black
  5. Stamping Decal Polishes: L'Oreal Jet-Set 003, Kiko 343 and Kiko 236
  6. Nail Art Decorations: Silver rhinestone.
  7. Top coat:  Essence Quick Dry


Thanks for reading!!! ♥
Grazie per la lettura!!! ♥

Tuesday, 7 July 2015

Navy Manicure With Winstonia Plate


Hi guys! Last week I received some Winstonia stamping plates to review and I begun to test them. I started with "Absolutely Nautical" that is a plate with marine designs. The images are well incise and work very well! The full designs measure  about 18 x 15 mm.
With this plate I did my manicure themed Navy.
Let's go with all details:
I applied two layers of white polish (Sinful Colors "Snow Me White" 101)  except for index and pinkie on which I used a blue polish (Michela Valenti 030). 
After that I stamped with Winstonia  "Absolutely Nautical" and Kiko Mirror 628.
For index and pinkie I made two decals for apply more easily the designs on my nails.
You can buy this plate here and use MANIA code to take 10% !!!
Below you will find the video tutorial....


Ciao ragazze! La settimana scorsa ho ricevuto alcuni stamping plates Winstonia da recensire e ho cominciato a testarli. Ho iniziato con "Absolutely Nautical" che è un piatto con disegni marini. Le immagini sono ben incise e funzionano molto bene! I disegni interi  misurano circa 18 x 15 mm.
Con questa piastra  ho fatto la mia manicure a tema marino.
Andiamo con tutti i dettagli:
Ho applicato due strati di smalto bianco (Sinful Colors "Snow Me White" 101), ad eccezione dell'indice e del mignolo su cui ho usato uno smalto blu (Michela Valenti 030).
Dopo di che ho timbrato con Winstonia "Absolutely Nautical" e Kiko Mirror 628.
Per indice e mignolo ho fatto due decals per applicare più facilmente le immagini sulle unghie.
È possibile acquistare questo piatto qui e utilizzare il codice MANIA per ottenere il 10% di sconto!!!
Qui di seguito troverete il video tutorial ....


Sinful Colors "Snow Me White" 101, Michela Valenti 030 and
Kiko Mirror 628


Winstonia  "Absolutely Nautical"


Video tutorial:


What I used:

Cosa ho Usato:


  1. Base: Layla Rocky Nail
  2. Base Polish: Sinful Colors "Snow Me White" 101 and Michela Valenti 030 (on index and pinkie)
  3. Stamping Plate: Winstonia "Absolutely Nautical" 
  4. Stamping Polish: Kiko Mirror 628
  5. Top coat:  Essence Quick Dry 

Tuesday, 30 June 2015

Floral Manicure With Born Pretty Store Water Decal


Hi girls!!! Today it's the turn of a water decal manicure. I chose a pattern with beautiful flowers that I got from BornPrettyStore. This water decal contains two different patterns of flowers! I love both of them so the choice was difficult!!!
Let's start with the details...
I applied two coats of Sinful Colors "Snow Me White" 101 and Kiko 283 (on ring finger and thumb) which reminds one of the colors of the water decal.
After that, I  cut out the images that I chose,  I removed the transparent film and I dipped the pieces of paper in the water for about 20 seconds (it's better to use warm water.... especially in winter). I peel off the designs and I applied onto my nails.
On ring finger and thumb I added two black studs.
Finally I applied the top coat.
You can buy this water decal here ....don't forget to use 10% off code: ABYW10
For more details I suggest you to see the video tutorial below!!!


Ciao ragazze !!! Oggi è la volta di una manicure con water decal. Ho scelto un modello con bellissimi fiori che ho ricevuto da BornPrettyStore. Questo water decal contiene due diversi tipi di fiori! Li amo entrambi quindi la scelta è stata difficile !!!
Cominciamo con i dettagli ...
Ho applicato due mani di Sinful Colors "Snow Me White" 101 e Kiko 283 (sull'anulare e e sul pollice), che ricorda uno dei colori del water decal.
Dopo di che, ho tagliato le immagini scelte, ho rimosso la pellicola trasparente e ho immerso i pezzi di carta in acqua per circa 20 secondi (è meglio usare l'acqua calda .... soprattutto in inverno). Ho staccato l'immagine e l'ho applicata sulle unghie.
Sull'anulare e sul pollice ho aggiunto due borchie nere.
Infine ho applicato il top coat.
È possibile acquistare questo water decal qui .... non dimenticate di utilizzare il codice per 10% di sconto: ABYW10
Per maggiori informazioni vi consiglio di vedere il video tutorial qui sotto !!!


 Born  Pretty BP-W04


Sinful Colors "Snow Me White" 101,  Kiko 283,  
Born  Pretty BP-W04 # 20595 and some black studs.


Video Tutorial:


What I used:

Cosa ho Usato:


  1. Base: Layla Rocky Nail
  2. Base Polish: Sinful Colors "Snow Me White" 101 and Kiko 283 (on ring finger and thumb)
  3. Nail Art Decoration: Water Decals Transfer Sticker BORN PRETTY BP-W04 # 20595
  4. Nail Art Decoration: Some Black studs
  5. Top coat:  Essence Quick Dry 

Monday, 17 November 2014

Born Pretty Store Decorations And Hehe Plate


Hi Everyone! Today I have reviewed some nail decorations I got  from BornPrettyStore.
Time ago this site contacted me for review some of their items. I'm so honored  to get this opportunity.
They have so many great things for nail art on their site....plates, stickers, water decals, rhinestone and much more.
You can use 10% coupon code for their store: ABYW10


Ciao a tutti!Oggi ho recensito alcune decorazioni per unghie di BornPrettyStore.
Tempo fa, questo sito mi ha contattata per recensire alcuni dei loro articoli. Sono molto onorata di avere questa opportunità.
Hanno tantissime cose per fare nail art sul loro sito .... piastre, stickers, water decals, strass e molto altro ancora.
È possibile ottenere lo sconto del 10% in questo negozio usando il seguente codice:  ABYW10


Here is a photo of the products that i used:
_______
Ecco una foto dei prodotti che ho usato:

Iridescent rhinestones black and white and golden decorations 3D


For this manicure I used two BornPrettyStore items: Golden decorations 3D and white/black iridescent rhinestones. You can find the decorations HERE and the rhinestones HERE.
I started with a black base. After that,  I stamped with five Kiko Mirror polishes (619, 622, 624, 626 and 628) and Hehe plate 004. While on middle and index finger i applied with a drop of top coat the golden decoration and i added a white rhinestone. 


Per questa manicure ho usato due prodotti di  BornPrettyStore: Decorazioni dorate 3D e strass bianco / nero iridescenti. È possibile trovare le decorazioni QUI e gli strass QUI.  
Ho iniziato con una base nera. Dopo di che, ho timbrato con cinque smalti Kiko Mirror (619, 622, 624, 626 e 628) e  la pistra Hehe 004. Mentre sul medio e l'indice ho applicato con una goccia di top coat  la decorazione dorata e ho aggiunto uno strass bianco.


Sinful Color "Black on Black", Kiko 619, 622, 624, 626 and 628


Hehe 004


Here you can see my video tutorial:
_____
Qui potete vedere il mio video tutorial:


What I used:

Cosa ho usato:


  1. Base:Sinful Color "Black on Black"
  2. Stamping Plate: Hehe 004
  3. Stamping Polish: Kiko Mirror 619, 622, 624, 626 and 628
  4. Nail Decoration: Golden decorations 3D from BornPrettyStore
  5. Rhinestone: Black iridescent rhinestone from BornPrettyStore
  6. Top coat: Essence Quick Dry

Tuesday, 16 September 2014

Stamping With Foil And QA Plates


Hi Everyone! In this post I wish to show you how to stamp with foils!!!
I started with a white polish base (Sinful Colors "Snow Me White" 101). I made a stamping decal with BornPrettyStore QA65 plate but if you want you can stamp directly on your nails. I preferred to make a decal because stamping with foils don't gives always best results...with a decal you can choose if the design is perfect before apply it on your nails!!!!
So, I applied the top coat on a plastic sachet and I let it dry.
I stamped with Konad gold and I immediately pressed on it the nail art  foil.
After that, I applied the top coat and let it dry for 8/10 minutes. I took the decal and I clipped it.  I applied on my nail the top coat and I let it dry for some minutes....(The nail must be still a little bit sticky), then,I applied the decal....
On the middle finger I choose to stamp directly on the nail with BornPrettyStore QA87 and Konad Gold and I pressed the nail art foil.
I put a little drop of top coat at the center and I applied a rhinestone.
Finally, I protected with Essence Quick Dry.
For a better understanding of this technique you can see my video tutorial below....


Ciao a tutti! In questo post voglio mostrarvi come timbrare con nail art foils!!! 
Ho iniziato con una base di smalto bianco (Sinful Colors "Snow Me White" 101). Ho fatto uno stamping decal con la piastra QA65 di BornPrettyStore, ma se volete potete timbrare direttamente sulle unghie. Ho preferito fare una decalcomania perché timbrare con il foil non dà sempre risultati ottimali ... con una decalcomania è possibile scegliere se il disegno è perfetto prima di applicarlo sulle unghie!!!! 
Così, ho applicato il top coat su una bustina di plastica e ho lasciato asciugare. 
Ho timbrato con Konad oro e ho subito premuto su di esso il foil oro. 
Dopo di che, ho applicato il top coat e ho lasciato asciugare per 8-10 minuti. Ho staccato la decalcomania e l'ho ritagliata. Ho applicato una mano di top coat e ho lasciato asciugare per qualche minuto .... (l'unghia deve essere ancora un po' appiccicoso), poi, ho applicato il decal .... 
Sul dito medio ho scelto di timbrare direttamente sull'unghia con BornPrettyStore QA87 e Konad Oro e ho premuto il foil. 
Ho messo una piccola goccia di top coat al centro e ho applicato uno strass. 
Infine, ho protetto con Essence Quick Dry.
Per una migliore comprensione di questa tecnica è possibile vedere il mio video tutorial qui sotto....


Born Pretty QA65


Born Pretty QA87


Video Tutorial: 


What I used:

Cosa ho Usato:


  1. Base: Sinful Colors "Snow Me White" 101
  2. Stamping Plate: Born Pretty QA 65 and QA87
  3. Stamping Special Polish: Konad gold
  4. Decorations for nail art: Rhinestones and Golden foil
  5. Top coat: Essence Quick Dry and then Essence Gel Look 

Wednesday, 9 April 2014

Essence Magnetic Top Coat and MoYou Salon Pro


Hi ladies! This is my last manicure. I used Essence Magnetic top coat...it works very well! I'm very satisfied because I can use it on any nail polish that I want!
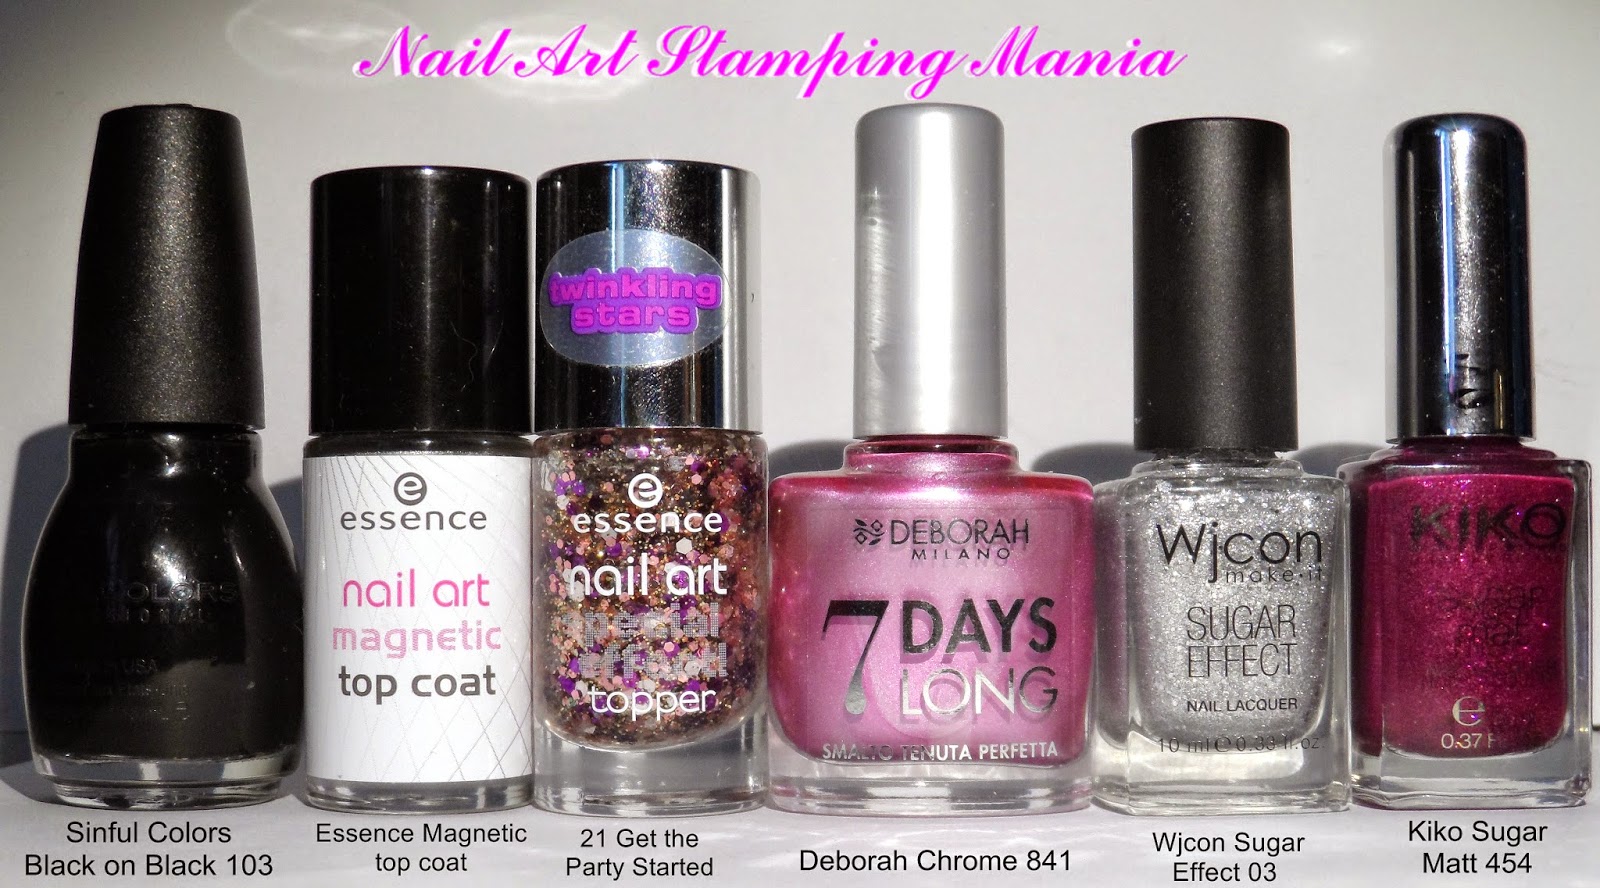
I used  Sinful Colors Black on Black 103 on thumb and ring finger. After it was dried I applied Essence magnetic top coat and I used the magnet on it. Finally I gave a coat of the new "Special Effect Topper" n. 21  ("Get the Party Started") by Essence.
On middle finger I used Deborah Chrome 841 and I stamped with MoYou Salon Pro 3 and special nail polish for stamping Konad Black.
Finally I applied on pinky Wjcon Sugar Effect 03 and on index finger Kiko Sugar Matt 454.
I used the top coat  (Kiko Gel Look) only on ring finger, middle finger and on thumb.


Ciao ragazze! Questa è la mia ultima manicure. Ho usato Essence Magnetic top coat... funziona molto bene! Sono molto soddisfatta perché posso utilizzarlo su qualsiasi smalto che voglio!
Ho usato Sinful Colors Black on Black 103 sul pollice e sull'anulare. Dopo che si è asciugato ho applicato Essence Magnetic top coat e ho usato il magnete su di esso. Infine ho dato una mano del  nuovo "Special Effect Topper" n. 21 ("Get the Party Started") di Essence.
Sul dito medio ho usato Deborah Chrome 841 e ho timbrato con MoYou Salon Pro 3 e lo smalto speciale per stamping nero di konad.
Infine ho applicato sul mignolo Wjcon Sugar Effect 03 e sull'indice Kiko Sugar Matt 454.
Ho usato il top coat (Kiko Gel Look) solo sull'anulare, sul medio e sul pollice.


Sinful Colors Black on Black 103, Essence Magnetic top coat,  Essence Special Effect Topper n. 21 "Get the Party Started", Deborah Chrome 841, Wjcon Sugar Effect 03 and Kiko Sugar Matt 454.


Sinful Colors Black on Black 103 + Essence magnetic top coat + magnet


Special Effect Topper n.21 "Get the Party Started"


MoYou Salon Pro 03


You can buy it here (English website) or on amazon.co.uk 
Puoi comprarli qui (sito italiano) o a Milano nel negozio DBLiving in via Vittor Pisani 6


What I used:

Cosa ho Usato:

  1. Base: Sinful Colors Black on Black 103, Essence magnetic top coat  and "Special Effect Topper" n. 21  ("Get the Party Started") by Essence on thumb and ring finger. Deborah Chrome 841 (on middle finger), Kiko Sugar Matt 454  (on index finger) and Wjcon Sugar Effect 03 (on pinky).
  2. Stamping Plate: MoYou Salon Pro 3
  3. Stamping Polish: Special stamping polish Konad black
  4. Rhinestone: Purple rhinestone on middle finger
  5. Top coat: Kiko Gel Look

Thanks for reading! :)