Showing posts with label Glitter. Show all posts

Tuesday, 25 October 2016

Spider Manicure With Marianne Nails Plate - Tutorial


Hi everyone! Today I have another Halloween manicure to show you! This time I used two plates from Marianne Nails!
I used an orange polish as a base (Kiko 280) and I added one coat of an orange glitter polish from Shaka (G2 Joy).
After that, I made a Double Stamping with the Marianne Nail plates 130 and 131 and Essence Stampy White and Black....
Very simple but I love the shadow effect of the spiders!
You can find the plate 130 HERE and the 131 HERE. 
You will find the video tutorial at the end of the post!


Ciao a tutti! Oggi ho un altra manicure Halloween da mostrarvi! Questa volta ho usato due piastre di Marianne Nails!
Ho usato un smalto arancione come base (Kiko 280) e ho aggiunto una mano di smalto arancione con glitter di Shaka (G2 Joy).
Dopo di ciò ho fatto uno stampong doppio con le piastre Marianne Nail 130 e 131 ed Essence Stampy bianco e nero.... 
Molto semplice, ma mi piace l'effetto ombra dei ragni!
È possibile trovare la piastra 130 QUI e la 131 QUI.
Troverete il video tutorial alla fine del post!


Marianne Nails n°130


Marianne Nails n°131


The pattern that I chosen


The pattern that I chosen


Video Tutorial:


What I used:

Cosa ho Usato:


  1. Base: Layla Rocky Nail
  2. Base Polish: Kiko 280 + Shaka G2 Joy
  3. Stamping Plate: Marianne Nails n°130 and n°131.
  4. Stamping Polish: Essence Stampy White and Essence Stampy Black
  5. Top coat:  Essence Quick Dry


Thanks for reading!!! ♥
Grazie per la lettura!!! ♥

Tuesday, 6 September 2016

Stamping Decals with Glitters and Holo polish - Tutorial


Hi girls! Today I'll show you an Ocean  manicure done with Stamping Decals with glitters! 
First of all I applied two layers of white polish. I let it dry and I prepared some stamping decals with Pueen Animal Safari 01 plate (from Theme Park Collection) and MdU 3 Blue Navy. 
I painted the decals with Color Club Over The Moon. I added the top coat, I applied some iridescent glitters of two different sizes and I let dry.
Later, I cut out the decals and I applied them on my nails. 
On my pinkie I applied one layer of top coat and I added glitters.
Finally, I applied the top coat!
This plate is sold singly HERE and the MdU stamping polishes are available HERE.
Don't miss the video tutorial below!


Ciao ragazze! Oggi vi mostrerò una manicure Marina fatta con Stamping Decals con glitter!
Prima di tutto ho applicato due mani di smalto bianco. Ho lasciato asciugare e ho preparato alcuni stamping decals con la piastra  Pueen Animal Safari 01 (dalla collezione Theme Park Collection) e MDU 3 Blue Navy. 
Ho dipinto i decals con Color Club Over The Moon. Ho aggiunto il top coat, ho applicato alcuni glitter iridescenti di due diverse dimensioni e ho lasciato asciugare.
Dopo, ho ritagliato i decals e li ho applicati sulle unghie.
Sul  mignolo ho applicato una mano di top coat e ho aggiunto i glitter.
Infine, ho applicato il top coat!
Questa piastra è venduta singolarmente  QUI e gli smalti per stamping MdU sono disponibili QUI.
Non perdete il video tutorial qui sotto!


Pueen Animal Safari 01


The pattern that I chosen


Video Tutorial:


What I used:

Cosa ho Usato:

  1. Base: Layla Rocky Nail
  2. Base Polishes: Wet n Wild White Crème 
  3. Stamping Plate:  Pueen Animal Safari 01
  4. Stamping Polish: MdU 3 Blue Navy
  5. Stamping Decal Polish: Color Club Over The Moon
  6. Nail Art Decorations:  Iridescent Glitters 
  7. Top coat:  Essence Quick Dry


Thanks for reading!!! ♥

Grazie per la lettura!!! ♥


Sunday, 29 November 2015

Christmas Flower Manicure with UberChic Christmas-01 Plate


Hi Everyone, today I will show you a Christmas manicure made with UberChic Beauty Christmas-01
Stamping Plate!
Some days ago I reviewed this beautiful plate and for today's mani I chose the flower Christmas design. 
I waited for this amazing image for much time!!!
Now, let's go with all instructions!!!
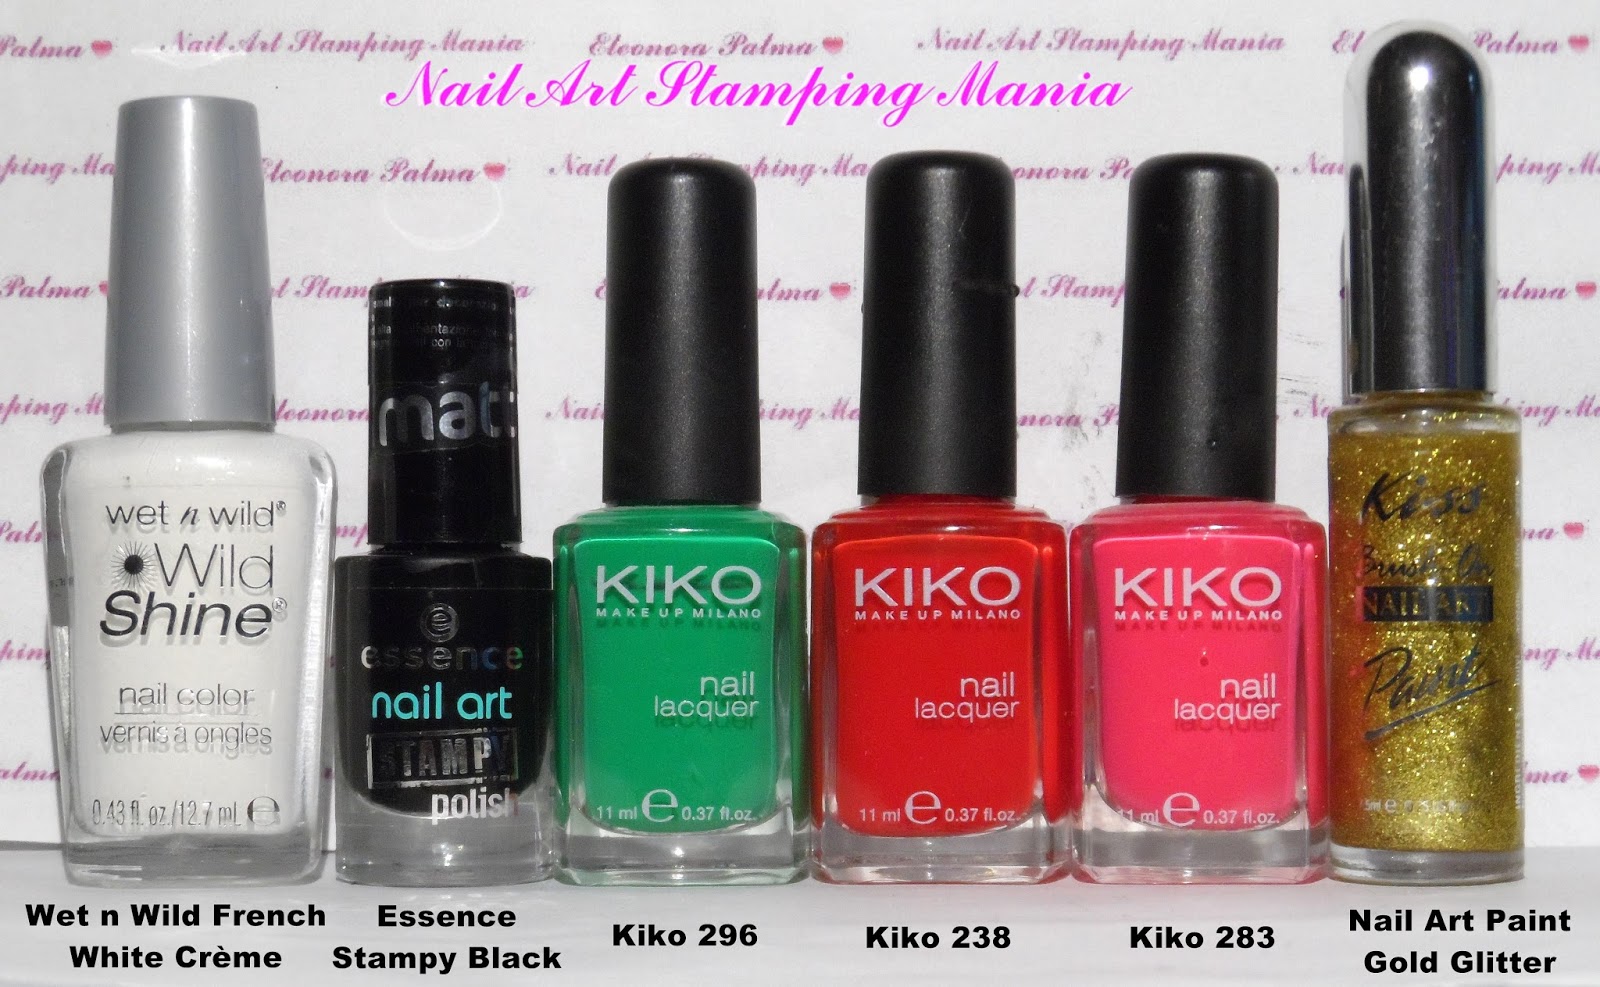
First of all I applied two layers of white polish (Wet n Wild French White Crème). 
Later, I prepared  some stamping decals with UberChic Beauty Christmas-01 and Essence Stampy Black...
After that, I painted the decals with Kiko 296, Kiko 238 and Kiko 283.
I left to dry the decals for some minutes,  I removed them and I applied on my nails.
I completed this manicure with some golden glitter to give more light to the Christmas  flower!
Finally, I protected the nail art with Top Coat. 
You can find this plate HERE.
Don't miss the video tutorial below!


Ciao a tutti, oggi  vi  mostrerò  una  manicure di  Natale  fatta  con la  piastra di  UberChic Beauty  
Christmas-01!!!
Qualche giorno fa ho recensito questa bellissima piastra e per la manicure di mio oggi ho scelto il disegno della stella di Natale. Ho aspettato per questa immagine stupefacente per molto tempo!!!
Ora, andiamo con tutte le istruzioni !!!
Prima di tutto ho applicato due strati di smalto bianco (Wet n Wild French White Crème).
Poi ho preparato alcuni stamping decals con UberChic Beauty Christmas-01 ed Essence Stampy nero ...
Dopo di che, ho dipinto i decals con Kiko 296, Kiko 238 e Kiko 283.
Ho lasciato asciugare i decals per alcuni minuti, li ho staccati e li ho applicati sulle unghie.
Ho completato questa manicure con un po'di brillantini dorati per dare più luce alla stella di Natale!
Infine, ho protetto la nail art con Top Coat.
È possibile trovare questa piastra QUI.
Non perdetevi il video tutorial qui sotto!


Wet n Wild French White Crème, Essence Stampy Black, Kiko 296, Kiko 238, Kiko 283 and
Nail Art Paint Gold Glitter.


UberChic Beauty Christmas-01


Video Tutorial:


What I used:

Cosa ho Usato:

  1. Base: Layla Rocky Nail
  2. Base Polish: Wet n Wild French White Crème
  3. Stamping Plate: UberChic Beauty Christmas-01
  4. Stamping Polish: Essence Stampy Black
  5. Stamping Decal Polishes: Kiko 296, Kiko 238 and Kiko 283
  6. Nail Art Decoration: Nail Art Paint Gold Glitter.
  7. Top coat:  Essence Quick Dry 

Monday, 24 August 2015

Iridescent Glitter from Born Pretty Store - Review


Hi Everyone! Today I'll show you a manicure with Iridescent glitter that I received from BornPrettyStore!!!
It's an iridescent glitter that changes color depending the color base. It seems that the glitter are of many colors but is the iridescent effect that gives different nuances!
These glitter are available Round  (1 mm, 2 mm  and 3 mm) and Hexagonal (1 mm and 4 mm). I chose the Hexagonal one in both sizes.
I started with two layers of a white base (Wet n Wild French White Crème) except for ring finger and thumb on which I applied a black polish (Wet n Wild French Black Crème).
Later I applied the top coat and I immediately positioned the glitter randomly...
Finally I used another layer of top coat to protect the glitter.
It's possible to purchase these items HERE. Remember to use the 10% Off code: ABYW10
You can find the video tutorial below!!!


Ciao a tutti! Oggi vi mostrerò una manicure con glitter iridescenti che ho ricevuto da BornPrettyStore !!!
Si tratta di gliitter iridescenti che cambiano colore a seconda del colore di base. Sembra che i glitter sono di molti colori, ma è l'effetto iridescente che dona diverse sfumature!
Questi glitter sono disponibili Rotondi  (1 mm, 2 mm e 3 mm) e  Esagonali (1 mm e 4 mm). Ho scelto quelli esagonali in entrambe le dimensioni.
Ho iniziato con due strati di smalto bianco (Wet n Wild French White Crème) tranne che per l'anulare e il pollice su cui ho applicato uno smalto nero (Wet n Wild French Black Crème).
Più tardi ho applicato il top coat e ho subito posizionato i glitter in maniera casuale ...
Infine ho usato un altro strato di top coat per proteggere i glitter.
E 'possibile acquistare questi articoli  QUI.  Ricordatevi di utilizzare il seguente codice per avere il 10% di sconto: ABYW10
Potete trovare il video tutorial qui sotto !!!


Hexagonal iridescent glitter 1 mm and 4 mm from
Born Pretty Store


 Hexagonal  glitter 4 mm


 Hexagonal  glitter 1 mm


Wet n Wild French White Crème, Wet n Wild French Black Crème 
and Hexagonal iridescent glitter 1mm and 4mm


Video Tutorial:


What I used:

Cosa ho Usato:
  1. Base: Layla Rocky Nail
  2. Base Polish: Wet n Wild French White Crème and Wet n Wild French Black Crème (on ring finger)
  3. Nail Art Decoration: Hexagonal glitter from Born Pretty Store 1mm and 4mm
  4. Top coat:  Essence Quick Dry 

Monday, 13 July 2015

Ocean Manicure With Glitter from Born Pretty Store


Hi girls! Today I made an Ocean Manicure using some Glitter from BornPrettyStore.
I started with one coat of Kiko Denim 465 and later I added one layer of BeYu 484 that is a duochrome polish...
On the middle finger,  ring finger and thumb I stamped with Born Pretty BP-18 and Kiko Mirror 628.
I added one layer of top coat and I started to apply the glitter n.10 (1 mm) with the help of a toothpick...Finally I used the top coat to protect the glitter.
This glitter is sold here  and it's available in different colors and size. The stamping plate is available here. Don't forget to use 10% off code: ABYW10
For a better understanding you can watch the video tutorial below!!!


Ciao ragazze! Oggi ho fatto una manicure marina utilizzando alcuni Glitter di BornPrettyStore.
Ho iniziato con una mano di Kiko Denim 465 e poi ho aggiunto uno strato di BeYu 484 che è uno smalto Duochrome ...
Sul medio, l'anulare e il pollice ho timbrato con Born Pretty BP-18 e Kiko Mirror 628.
Ho aggiunto uno strato di top coat e ho iniziato ad applicare il glitter n.10 (1 mm), con l'aiuto di uno stuzzicadenti ...Infine ho usato il top coat per proteggere i glitter.
Questi glitter sono venduti qui e sono  disponibile in diversi colori e dimensioni . La piastra è disponibile qui. Non dimenticate di utilizzare il codice per avere il 10% di sconto: ABYW10
Per una migliore comprensione è possibile guardare il video tutorial qui sotto!!!


Kiko Denim 465, BeYu 484, Kiko Mirror 628 and
 Born Pretty Round Glitter n.10 (1 mm)


 Born Pretty Round Glitter n.10 (1 mm)


Duochrome Effect


Born Pretty BP-18


Video Tutorial:


What I used:

Cosa ho Usato:

  1. Base: Layla Rocky Nail
  2. Base Polish: Kiko Denim 465 + BeYu 484
  3. Stamping Plate: Born Pretty BP-18
  4. Stamping Polish: Kiko Mirror 628
  5. Nail  Art Decoration: Born Pretty Round Glitter n.10 (1 mm)
  6. Top coat:  Essence Quick Dry